
During severe thunderstorms or hurricanes, homes may be damaged or destroyed by high winds. Debris flying through the air can break windows and doors, allowing high winds inside the home. In extreme wind storms, the force of the wind alone can cause weak places in your home to fail. Experts who study the durability of homes have found four areas that should be checked for weakness—windows, doors, the roof, and if you have one, the garage door.
In this fact sheet, we discuss some things you can do to help make your home stronger before the next storm strikes. Some of these improvements are permanent, while others are installed for temporary wind protection. It is important to get prepared before an extreme storm threatens. Even though these projects, if done correctly, can make your home safer during a storm, they are no guarantee that your home won’t be damaged or even destroyed. If you are told to evacuate, do so.
Exterior Doors and Windows
Exterior walls, doors, and windows are the protective shell of your home. If your home’s protective shell is broken, high winds can enter and put pressure on your roof and walls, causing damage. You can protect your home by strengthening the doors and windows.
Storm Shutters
Installing storm shutters over all exposed windows and other glass surfaces is one of the easiest and most effective ways to protect your home. You should cover all windows, French doors, sliding glass doors, and skylights. There are many types of manufactured storm shutters available. For more information on manufactured shutters, check with a local building supplies retailer. If you install manufactured shutters, follow the manufacturer’s instructions carefully. Before installing shutters, check with your local building official to find out if a building permit is required. It is important that you have your shutters either installed or marked and stored so they can be easily installed during a hurricane watch.
Plywood Storm Shutters
Plywood shutters that you make yourself, if installed properly, can offer a high level of protection from flying debris during a storm. Plywood shutters can be installed on all types of homes. Measure each window and each door that has glass, and add 8 inches to both the height and width to provide a 4-inch overlap on each side of the window or door. Sheets of plywood are generally 4 feet by 8 feet (4 × 8 feet). Tell your local building supply retailer the size and number of openings you need to cover to determine how many sheets of plywood to buy.
To install plywood shutters, you will need bolts, wood or masonry anchors, large washers, and 5/8-inch exterior-grade plywood. For windows 3 × 4 feet or smaller installed on a wood frame house, use 1/4-inch lag bolts and plastic-coated permanent anchors. The lag bolts should penetrate the wall and frame surrounding the window at least 1-3/4 inches. For larger windows, use 3/8-inch lag bolts that penetrate the wall and frame surrounding the window at least 2-1/2 inches. For windows 3 × 4 feet or smaller installed on a masonry house, use 1/4-inch expansion bolts and galvanized permanent expansion anchors. The expansion bolt should penetrate the wall at least 1-1/2 inches. For larger windows, use 3/8-inch expansion bolts that penetrate the wall at least 1-1/2 inches.
The tools you will need are a circular or hand saw, a drill with the appropriately sized bits, a hammer, and a wrench to fit the bolts. To be safe, use eye protection and work gloves.
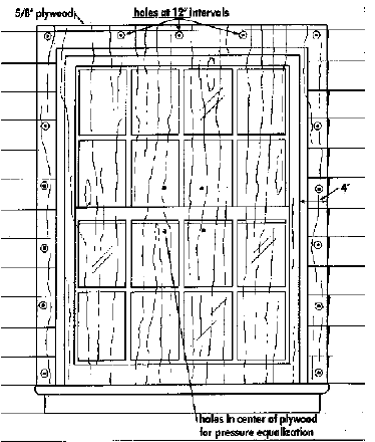
Cut the plywood to the measurements for each opening. Drill holes 2-1/2 inches from the outside edge of the plywood at each corner and at 12-inch intervals. Drill four holes in the center area of the plywood to relieve pressure during a strong wind storm. Place the plywood over the opening, and mark each hole position on the outside wall. Drill holes with the appropriate size and type of bit for the anchors. Install the anchors, the plywood, and the bolts to make sure they fit properly. On wood-frame houses, make sure that the anchors are secured into the solid wood that frames the door or window and not into the siding or trim. Mark each shutter so you will know where it is to be installed, and store the shutters and the bolts in an accessible place.
If the opening is larger than one sheet of plywood, you will need to make shutters with 2 × 4 bracing. This bracing can be two 2 × 4s at the middle and bottom of the two sheets of plywood, evenly spaced, with the 2-inch side attached to the inside of the storm shutter. Attach the 2 × 4s to the outside of the storm shutter with 2-inch, 10-gauge wood screws before installing the shutter.
Impact-resistant windows are optimal for windows not easily fitted with hurricane shutters or those that are hard to reach. Make sure to install an impact resistant system on sliding glass doors because they are larger and more vulnerable to wind and debris than windows. If these doors cannot be replaced, then at the very least install shutters.
Double Entry Doors
Most double doors have an active and an inactive or fixed door. Check to see how the fixed door is secured at the top and bottom. Installing slide locks (also called head and foot bolts) at the top and bottom will further strengthen the door. Ensure that the locks are mounted securely to the sub-floor and door header, not just into the trim.
To strengthen the hinge side, ensure at least three hinges are properly installed with the hinge screws penetrating through the door jamb into the studs. The bolts or pins that secure most doors are not strong enough. Some door manufacturers provide reinforcing bolt kits made specifically for their doors. Check with your local building supplies retailer to find out what type of bolt system will work for your door. The door bolt materials should cost from $10B40, depending on the type and finish. Doors with windows will need additional protection from flying debris. See the section on storm shutters for how to protect windows.
Single entry doors need deadbolts that have a long throw (at least 1 inch) and penetrate into the stud framing not just the doorjamb.
Double-Wide Garage Doors
Because of their width, double-wide garage doors are more susceptible to wind damage than single doors. Unless you have a tested hurricane-resistant door, the wind may force it out of the roller track, especially if the track is light weight or some of the anchor bolts are not in place. This occurs because the door deflects too much under excessive wind pressure and fails. If the garage door fails, high winds can enter your home through the garage and blow out doors, windows, walls, and even the roof. Certain parts of the country have building codes requiring garage doors to withstand high winds. Check with your local building inspectors to see if there are code requirements for garage doors in your area.
Some garage doors can be strengthened with retrofit kits. Check with your local building supplies retailer to see if a retrofit kit is available for your garage door. You can expect to pay from $70B150 to retrofit your garage door. Many garage doors can be reinforced at their weakest points. Retrofitting your garage doors involves installing horizontal bracing onto each panel. This horizontal bracing can be part of a kit from the garage door manufacturer.
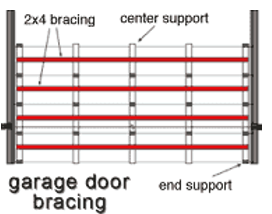
The garage door industry strongly recommends that any determination concerning the need to reinforce or replace a garage door be based on an inspection by a trained door systems technician or a qualified professional engineer. Adding weight to a garage door for reinforcement may require an adjustment to or replacement of the door’s counterbalance system. Only a trained door systems technician should perform the adjustments or replacement.
If you decide to retrofit your garage door with a kit that allows you to operate the door after it is installed, make sure the door is balanced. You may also need heavier hinges and stronger center supports and end supports for your door.
Check the track on your garage door. With both hands, grab a section of each track and see if it is loose or if it can be twisted. If so, a stronger track should be installed. Make sure that it is anchored to the 2 × 4s inside the wall with heavy wood bolts or properly attached to masonry with expansion bolts.
After you have retrofitted your door, you need to check to see if it is balanced. To check, lower the door about halfway and let go. If it goes up or down, the springs will need adjusting. The springs are dangerous and should be adjusted by a professional. If you are unable to retrofit your door, you can purchase specially reinforced garage doors designed to withstand winds of up to 120 miles per hour. These doors should be installed by a professional.
The Roof
During a windstorm, the force of the wind pushes against the outside of your home. The force is passed along from your roof to the exterior walls and finally to the foundation. Homes can be damaged or destroyed when the energy from the wind is not properly transferred to the ground. The first thing you should do is determine what type of roof you have. Homes with gabled roofs are more likely to suffer damage during a hurricane.
A gabled roof looks like an A on the ends, with the outside wall going to the top of the roof. The end wall of a home with a gabled roof takes a beating during a hurricane, and those that are not properly braced can collapse, causing major damage to the roof. In most homes, gabled roofs are built using manufactured trusses. Sheets of roof sheathing, often plywood, are fastened to the trusses with nails or staples, and roofing material is fastened to the sheathing. In many cases, the only thing holding the trusses in place is the plywood on top. This may not be enough to hold the roof in place during a hurricane. Installing additional truss bracing makes your roof’s truss system stronger.
To inspect your roof’s bracing, go into the attic. While working in your attic, you should wear clothing that covers your skin, work gloves, a hat, eye protection, and a dust mask. If your attic is not floored, be careful to walk only on the wood joists, or install boards wide enough to walk on as you work. Notice how the plywood is attached to the truss system. If most of the large nails or staples coming through the sheathing have missed the trusses, consider having the sheathing properly installed.
Truss Bracing
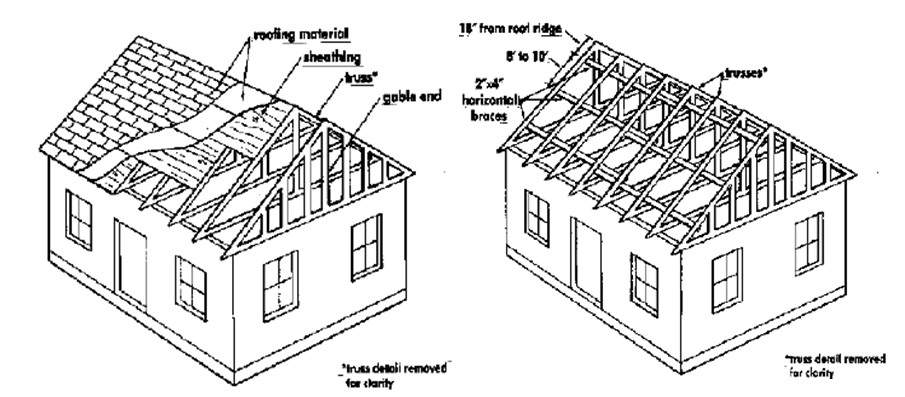
In gabled roofs, truss bracing usually consists of 2 × 4s that run the length of the roof. If you do not have truss bracing, it should be installed. You can do this yourself or hire a professional.
Install 2 × 4s the length of your roof, overlapping the ends of the 2 × 4s across two trusses. Braces should be installed 18 inches from the ridge, in the center span, and at the base, with 8B10 feet between the braces. Use two 3-inch, 14-gauge wood screws or two 16d (16 penny) galvanized common nails at each truss. Because space in attics is generally limited, screws may be easier to install.
Gable End Bracing
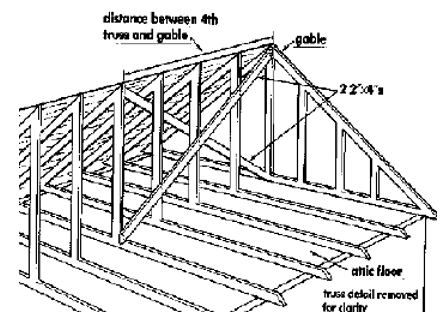
Gable end bracing consists of 2 × 4s placed in an ―XI pattern from the top center of the gable to the bottom center brace of the fourth truss, and from the bottom center of the gable to the top center brace of the fourth truss. Use two 3-inch, 14-gauge wood screws or two 16d galvanized common nails to attach the 2 × 4s to the gable and to each of the four trusses (see diagram on next page).
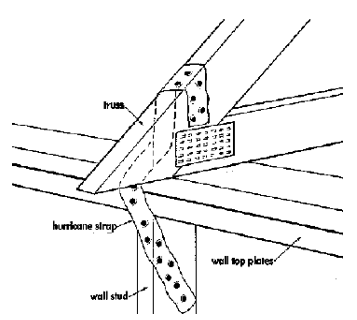
Hurricane Straps
There are many types of roof design. Regardless of your type of roof, hurricane straps are designed to help hold your roof to the walls. While you are in the attic, inspect for hurricane straps of galvanized metal.
Hurricane straps may be difficult for homeowners to install, and you may need to call a professional to retrofit your home with hurricane straps. Check with your local government building officials to see if hurricane straps are required in your area.
The recommendations in this fact sheet are not intended to replace local building code requirements or to serve as the only options for protecting your home from severe wind damage. For more specific local information on protecting your home from wind damage, contact your local building official; your local building supply retailer; or a building professional, such as an engineer, architect, or experienced contractor.

—
Download, save or print this resource before a disaster happens!
Protecting Your Home From Hurricane Wind Damage ( En Español )
Adapted by Janie Harris, Extension Housing Specialist from: Against the Wind – Protecting Your Home from Hurricane Wind Damage, a publication developed by the American Red Cross, Federal Emergency Management Agency, The Home Depot, National Association of Home Builders, and Georgia Emergency Management Agency http://www.redcross.org/services/disaster/beprepared/agnstwd.pdf#search=’securing%20roof%20before%20a%20hurricane’
“Wind Damage” (CC BY-NC-ND 2.0) by StuffEyeSee
Additional Reference
University of Florida Extension – Disaster Handbook, http://disaster.ifas.ufl.edu/

